Contents · 14 sections
I studied every piece of research about vacuum bell therapy. I came up with a general plan you can follow and what to expect during the treatment. Some of the recommendations are made by Mr. Eckart Klobe himself.
In contrast, others come from my personal experience and the experiences of others I encountered in forums that improved their deformities with the vacuum bell.
This blog post will clarify how to use the vacuum bell during therapy.
What to Expect First
It is recommended to do the first vacuum bell therapy under medical supervision. If you choose to overlook this and start the treatment in your home, I advise you to have a relative or friend next to you.
You start by lying down to set the suction cup on your chest. Please place it tightly and comfortably.
Slowly pump and increase the vacuum pressure, as there shouldn’t be any considerable pain. Feel how the inverted chest starts to lift to the transparent glass of the device.
At this point, it is entirely natural to have mixed feelings. You’ll feel hopeful, but at the same time, you’ll feel slight discomfort. Pump and apply negative pressure to the point where you feel a minor ache.
Then, carefully try to stand up and walk around your room. Notice how the device stays on your chest without falling. That’s the power of negative pressure.
How Long to Apply
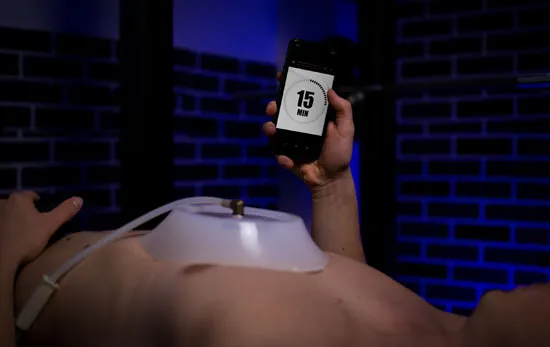
According to Eckart Klobe, 15 minutes of wearing is enough for the first time. Your goal isn’t to correct the deformity after one single therapy. The purpose of the first session is to get familiar with the power of the vacuum bell.
To finish the first therapy, it is good to do a follow-up Medical check-up. A lot of us are starting vacuum bell therapy on our own. There is nothing wrong with that. Even Eckart Klobe corrected his deformity independently.
Timetable
First 4 Weeks
While you apply the vacuum bell during the first four weeks, you will need to get used to the feeling of your sternum being pulled close to the viewing window of the device.
This can be expected in two weeks if the patients are younger or if the deformity is mild. Older patients or patients with more severe pectus excavatum can do this in about four weeks.
If you’re very uncomfortable or feel pain, you shouldn’t force this. Do it gradually and slowly. Don’t force the lifting of the sunken chest to the transparent window in just a few days.
According to Eckart Klobe, it should take two to four weeks. That’s because lifting the chest too fast can temporarily cause unnecessary stability losses in the rib cage.
After 2 Months
After two months of continuously applying the vacuum bell every day, with the purpose of the breastbone to come close to the transparent window of the device, the sternum of most adults and teenagers will stay elevated on its own after each therapy.
The elevation will last a few hours until it returns to the concave position. Comparatively, children will experience chest elevation for just a few minutes before it falls back to the initial position. That’s because the chest wall of older patients is stiffer.
Within 3 Months
You should expect the pectus excavatum deformity and poor posture to improve significantly.
Also, the chest will remain flattened between one treatment and the next than when you started the treatment. According to Eckart Klobe, this improvement was noted to be 0.39” or 1 cm in many cases.
After 4 Months
The patient will have much more physical endurance. Lung capacity and heart functioning will improve. You’ll experience a deeper breath because of the chest expansion.
There is still progress in enhancing the deformity, but the progress is slower than in the first three months. The positive thing is that the patients are used to the everyday vacuum bell appliance after four months.
They aren’t bothered by the device and don’t even think about it when applied. According to Eckart Klobe, in this stage, the progress is usually 0.39”, or 1 cm a month. This is the progress until the deformity is repaired.
Phases
To fix pectus excavatum with vacuum bell therapy, you must go through three stages. The stages will define the frequency of the vacuum bell application.
Generally, the more you apply the vacuum bell, the “softer” your breastbone will become. After several months of daily vacuum bell application, the treatment won’t be as efficient as when you started.
Because of that, you will need to take rest days in between vacuum bell applications. That will help you maintain the effectiveness of the treatment.
Phase 1
During the first phase, you will observe rapid improvement in your deformity. You’ll be highly motivated to continue the treatment because of the success.
The breastbone will elevate, and your bodily appearance will change. This will help you both physically and mentally. For representative purposes, this stage will last until your breastbone is raised to roughly 20 mm in depth.
If your breastbone is sunken deeper than 20 mm, I recommend applying the vacuum bell daily. If you notice skin rashes in the area where you use the vacuum bell, you should apply the device for three consecutive days, followed by one day of rest. One day of rest will give your skin time to heal.
Phase 2
The second phase starts when the deformity improvement slows, but you can still see weekly improvements. Usually, this stage begins when your sternum depth is about 20 mm and lasts until it improves to 10 mm.
I recommend you apply the vacuum bell for two consecutive days and one day off at this stage. During this phase, your skin will get more itchy and sensitive. You need to practice skincare more intensively.
Phase 3
In the third phase, the progress will grind to a halt. You will begin to lose motivation in this stage because you’ll see improvement only for several weeks or months.
It will start when you go below 10 mm and last until you correct the pectus excavatum deformity. If satisfied with the results, you can stop the vacuum bell treatment midway through this stage and live happily with your flat chest.
You will need to apply the vacuum bell device every other day during this stage. If you’re less motivated but still want to continue the therapy, you can even take a week off every month.
It will be enough for your skin to heal completely and gain the lost motivation to defeat the deformity forever.
How Long to Apply in a Day
At the beginning of the therapy, it is enough to apply the vacuum bell two times a day for about 30 minutes. The frequency and intensity should be increased later in the treatment. Your body needs to get used to the vacuum bell during the first weeks of therapy.
Learn to listen to your body. Don’t force yourself to wear the vacuum bell for about 8 hours in the first week. If you do that, you’ll feel resentment about using the device. You can’t form a habit this way.
According to Mr. Klobe, starting slowly and increasing the duration with time is always recommended. Start applying the vacuum bell for about 30 minutes a day when starting. Then, gradually increase the period.
How Much to Pump
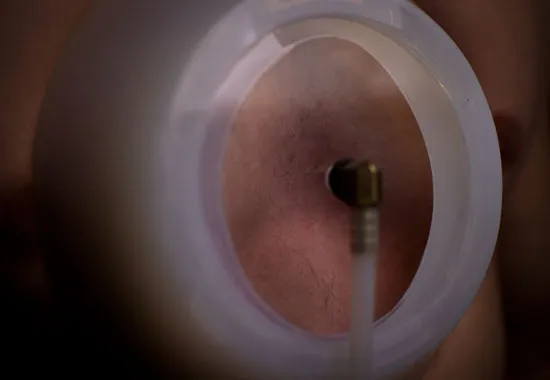
Always pump until your inverted chest becomes flat. You can see this through the see-through window of the suction bell. Consider this as a “warm-up” for your chest.
Wait 5 minutes until the chest relaxes and gets used to this new elevated position. After the 5 minutes pass, you should squeeze the sucking pump three times. Then, repeat and pump every 5 minutes.
I always wait until the unpleasant sensation diminishes. After about 20 minutes, the hollow chest almost touches the suction cup’s window.
At this point, pumping doesn’t do anything. It can’t elevate further because that is as far as possible. I recommend sitting in this state for about 40 minutes when your chest reaches this point.
After 60 minutes, let air in and finish the successful 1-hour therapy. Listen to your body. If you feel sharp pain, stop immediately.
How to Maintain without Pumping
I stumbled upon many people complaining about a pressure maintenance problem. They had to pump continually to maintain the elevated breastbone to the window.
This isn’t very pleasant if you try to do therapy while sleeping. During the day, you can pump to maintain the negative pressure.
However, it is a whole different story at night. I had this exact problem while sleeping. As soon as I woke up, I noticed that the suction cup had stayed loose on my chest.
Two Problems to Fix
First Problem
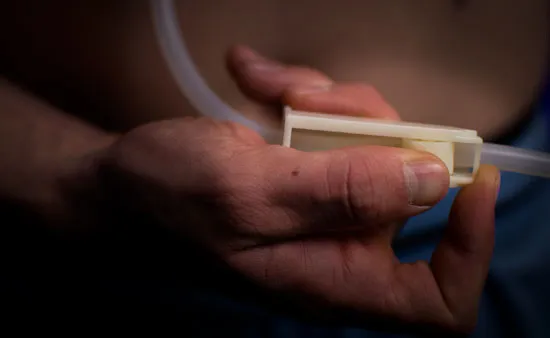
The first problem is caused by the pump, mainly because the valve is not tight. After pumping and reaching the desired chest elevation, take the pump off. At the same time, squeeze the hose tightly so no air will come out.
Most vacuum bells usually come with a silicone plug designed for this purpose. If it doesn’t include one, any circular item made of metal, plastic, or silicone with a diameter of around 7mm will work.
You can grind it out to become cone-shaped. Then, it would be much easier to insert it.
Stick the silicone plug (stopper) in the hose, and you’re good to go. After that, the device should work correctly and stay tight without pumping!
Second Problem
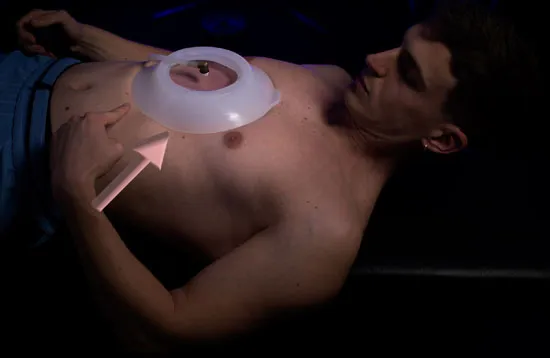
The second problem is with the suction cup positioning on your chest. If you try to sleep with the vacuum bell applied, you should lower it on your chest.
Contrary, if you place it in a higher position on your chest, the air will slowly get drawn out of the device. You can’t hear the air getting out.
14 Vacuum Bell Warm-Up Exercises and Stretches
Before the vacuum bell application, I will show you the exercises and stretches created to warm up and loosen up your chest muscles and soften the cartilage and bones.
They are also helpful for pectus posture improvement. The warm-up will take at most 5-10 minutes of your day. Do the exercises slowly, and control the movement.
Dumbbell Hold

Take a dumbbell with both hands, and lay with it in front of you. Make sure you fully extend your arms and legs.
It is similar to the superman core exercise, but the only difference is that your legs will stay on the ground.
You’ll mostly feel this movement in your chest. Hold the dumbbell for at least 5 seconds, then lower it. Repeat five times.
Drunk Man Stretch

Lay on the right side of your body, with the right leg fully extended and the left leg resting on the ground just in front of the right.
Put your right hand under your head. You should slightly turn your head to the ground. It would be best to place your left hand behind your head with the fingers pointing to the back.
Then, rotate your head toward the ceiling. Feel the stretch in your chest and perform ten deep abdominal breaths. Repeat with the other side.
Dumbbell Pullover

This exercise serves as a warm-up movement for the vacuum bell application. It would help if you did it on a bioenergetic stool.
Grab a light dumbbell and rest your upper back on the towel placed on the stool, with your feet flat on the ground. Hold the weight above your chest, and slowly lower it with straight arms until they become parallel with the floor.
Then, remain in the stretched-out position for about 5 seconds. Bring the weight back to the initial work and repeat it five times. You should feel the stretch in your chest muscles and lats.
Standing Twist Stretch

Stand with your legs set at shoulder-width-apart, right next to the side of a door frame. Put the left palm on it.
With your right arm fully extended, push your hips forward and rotate to the right side as much as possible. Feel the stretch and hold it for about 30 seconds. Repeat with your other side.
Side Stretch

Set your feet at shoulder-width apart. Step on your feet with your legs straight. Take your left arm and put it over your head.
Lean to the right and feel the stretch on your sides. Your right arm should slide slowly on your right side.
With each breath, try to stretch even further. Hold the stretch for about 30 seconds, and repeat with your other side.
Chest Rotation 1

Hold the left pectoral muscle with your feet set shoulder-width apart with the right hand. Rotate to the left side with your left arm fully extended above your shoulders.
Your head should turn in the direction of your left arm. Squeeze the glutes and keep your hips forward. Hold for about 30 seconds and repeat with the other side.
Chest Rotation 2

Hold the lower ribs’ left side with your right hand with the exact foot positioning as with the first stretch variation. Usually, the left side of the ribs protrudes more because of the pectus excavatum deformity.
If that’s your case, hold the rib flare. Rotate as much as possible to the left side with your left arm fully extended below your shoulders.
Squeeze the glutes to protect your lower back and keep your hips forward. Hold for 30 seconds. Do the same for the other side.
Chest Expansion

Stand with your feet set shoulder-width apart. Squeeze the glutes to protect your back from hyperextending. Stretch your arms behind, as much as possible, below shoulder level. Don’t hyperextend your lower back. Feel the stretch in your chest.
Hold this for about 30 seconds. Then, take your arms above shoulder level. You’ll feel the stretch in a different spot on the chest. Again, hold for another 30 seconds.
Core Stretching Exercises
The following stretches will help you with the effectiveness of vacuum bell therapy. In my experience, the sternum elevation lasted longer after doing these exercises.
Even though it is not mandatory, I recommend doing these exercises before the vacuum bell application.
Hold the stretches for at least 60 seconds. At first, some of them may be hard to execute, but eventually, you’ll build your endurance to the point where you’ll be able to hold them for longer.
If you practice yoga, you may be familiar with some exercises. I am a massive advocate for pectus excavatum sufferers to do yoga daily. It even helps in vacuum bell therapy.
Bridges
Depending on your flexibility levels, doing one of the bridge’s three variations is essential.
At first, you’ll struggle with it, but you’ll progress in this movement as you try it consistently. It may take a few months to be flexible and robust enough to go from 1a to 1c.
1a - Headstand Bridge

First, lay on the ground flat and bend at the knees until your feet touch your butt. Put your hands right next to your head so the fingers of the palm point to you.
Raise the hips as much as possible. You should distribute the weight on your feet, head, and hands. If it is your first time practicing this movement, expect to shake a lot while holding this position.
Set a goal to hold this position for 60 seconds. After you can hold it for 60 seconds, it is time to go to the bridge’s next variation.
1b - Handstand Bridge

Repeat the same movement, but try to distribute the weight only on your hands and feet. Elevate the head and try to push your shoulders as much as possible.
This movement is a great strength developer for your shoulders. It mimics the overhead barbell press. When holding this for 60 seconds, do the following more challenging variation.
1c - Elbow Bridge

The last and final bridge variation requires a lot of strength and shoulder flexibility. As you get into a headstand bridge, try to shift the whole weight of your body to your feet and head.
Grab the back of your head with your hands, and place the elbows on the ground at a 45-degree angle. Push your hips up, so the weight is supported on your elbows.
Then, you need to straighten your legs and push the body forward, so you feel a more significant stretch on your abdominals and chest muscles.
Set a goal to hold this position for about 60 seconds. This is the final progression of the bridge. Stick to this variation as soon as you can hold 1b for 60 seconds. The goal of 1a and 1b is to progress until you can do 1c.
Sitting Rotation

Sit down in a meditation position. Sitting on your left leg, with the knees bent at 90 degrees, would be best.
Your right leg should be in front of your left. It would help extend your right arm so your hand touches your shin area, and your elbow sits comfortably on your thigh.
Rotate with your body and extend your left arm to be placed behind your left hip. Your fingers should point away from your body, and your head should point toward your fingers.
You can push with your right arm on your right thigh for a better rotation. Hold for about 60 seconds. Repeat with your other side.
Bow Pose

Lay down flat on your stomach and chest. Bend your legs, and grab your feet from the outside with your hands.
Pull your feet upwards so you lift your upper chest and legs as much as possible. Hold your head up and forward. Feel the stretch in your chest, abdomen, and quadriceps.
Half Frog Pose

Lay flat on your chest and stomach. Place your forearm at a 90-degree angle right in front of you. Support the weight on your forearm.
Bend your left leg and hold your foot with your left hand from the inside. Pull your leg to your butt, and rotate your chest towards it.
Your head should point in the direction of your leg. Hold the stretch for 60 seconds, and repeat on the other side.
Seal Pose

Lay down flat on your stomach. Put your arms right next to your abdomen, with your fingers pointing in front of you. Extend and fully engage your arms, pushing your hips slightly off the ground.
Squeeze the glutes to protect your lower back. Bend back as far as you can while stretching the chest and abdomen. Your head should point to the sky. Hold for 60 seconds.
Camel Pose

Start kneeling, and slowly lean back until you can grab your heels. Push the hips as forward as you can.
Open up the frontal part of your body and breathe with your diaphragm. Expect to shake and vibrate during this exercise. Hold for 60 seconds.
Conclusion
In this blog post, I wrote about the phases of vacuum bell treatment and what to expect during the first few months of therapy. You’ll be motivated by the fantastic progress in the first months.
Then, the progress will slow down, but the deformity will still improve. It would be best if you were consistent in applying the device.
If needed, you can take a few days’ breaks if you experience skin problems.
Thank you for reading!
How to Prevent Vacuum Bell Skin Damage
The vacuum bell application time differs from person to person and depends on how sensitive your skin is. Applying the device to your chest is the only way you can know whether your skin is sensitive.
However, skin irritation isn’t something important to worry about. The skin heals very quickly, but the concave chest has the potential to harm your heart and lungs.
Vacuum Bell Skin Problems I Had
When I started the therapy, I had skin problems because I used it for more than two hours during the first week.
The upper levels of the skin became red, and tiny bubbles appeared on its surface. Also, some bruising could be visible, caused by blood being sucked into the upper layers of the skin.
That’s caused by applying too much pressure in the first couple of weeks. This will heal with time, but there are a few ways to speed up skin healing.
I had horrible skin irritation for a long time. That prevented me from applying the vacuum bell therapy daily. The redness will hardly disappear unless you interrupt the treatment for a few days until it heals.
Skin Moisturization Importance
At that time, I figured out that the problems were caused by skin dehydration. Moisturizing the damaged skin is obligatory.
After each suction cup application, I treated the skin with moisturizing body milk once daily. After doing that, I didn’t have any skin complications.
What Helped Me Calm My Skin

I have always used pure almond body oil that my mother bought. I highly recommend L’Occitane Almond Body Oil. It works perfectly. That’s a great body oil to protect the skin from negative pressure.
You can also try coconut oil, castor oil, emu oil, Aloe Vera extract, zinc ointment, and CeraVe Moisturizing Cream for Itch Relief.
Penaten Cream

Apply Penaten Cream from Germany at night. It contains zinc oxide, a protective coating for mild skin irritations. It also promotes the healing of chapped skin and diaper rashes.
Oral Supplements That Can Help
Astaxanthin
You can also take an oral supplement called Astaxanthin. An antioxidant is said to have many health benefits taken with Phospholipids (krill oil). This speeds up skin healing and increases skin thickness, flexibility, and water retention.
Astaxanthin is a natural sunscreen that protects your skin from harmful UV radiation. It is proven to make your skin darker when you’re taking it. It is a raw food colorant that works inside out.
Before taking this supplement, it is recommended to consult with your primary physician.
Collagen
Collagen is the most abundant protein in the human body. It is responsible for the skin’s structure, stability, and strength. Sufficient intake helps in proper skin repair. It can be taken as a supplement in the form of gel pills.
Vitamins
Intake of vitamins is essential not only for your skin health but also for your overall well-being. According to Healthline, the four best vitamins for your skin are C, D, E, and K. Make sure you get enough of these four vitamins.
What to Do If Blisters Appear?
This problem occurs when you vacuum too harshly, without a gradual progression. Remember to start lightly and increase the vacuum over time. I experienced blisters three times during my therapy.
It is ideal to leave the blisters to heal alone without popping them. Most of the time, they disappear after 2-7 days, depending on their size. Usually, the blisters are filled with liquid.
Don’t Pop Them
I used to cut and drain them with a clean fingernail. Then I disinfected them with Ethanol. After that, I applied chamomile.
The alcohol works as a disinfectant, and the chamomile mixture is anti-inflammatory. However, popping, especially with fingernails, isn’t recommended.
Allow the Sores and Blisters to Heal
Just in case, you should continue the vacuum bell therapy only when the sores are healed. If you continue to use the vacuum bell while the blisters are unhealed, there is a high chance of putting new secretions into the skin sore.
Don’t be concerned about the few day’s break. The indentation will stabilize again, and the chest elevation will last longer.
How to Deal With Itching


Itching during vacuum bell therapy is very unpleasant. It usually happened during the hot summer days while my body was sweating excessively. I found a simple way to deal with this irritating itching.
Before applying the suction cup:
- Massage your itching area with a towel soaked in hot water
- Use a dry cloth to absorb the water off your chest
- Use a hair-blower to dry the area thoroughly
- Make sure the vacuum bell is clean.
Shave Off Chest Hair

I have a lot of chest hair, so I had to shave it off because it prolonged the skin-drying process. The hair also caused me to itch and obstructed the vacuum bell seal.
Make sure that everything is dry before applying the VB. The massage promotes blood flow to the nerve endings responsible for the itching. This stops skin irritation.
Use a Hair Dryer On the Chest Before Applying

I learned this method from a fellow pectus excavatum sufferer, who used the vacuum bell therapy for several months. At first, the vacuum caused him excessive redness, rough, scaly skin, and even blisters.
He was in pain. However, he managed to find a solution to this. He didn’t give up on the vacuum bell therapy and could correct his 3 cm deep inverted chest.
Dry Everything
Before putting the vacuum bell on, make sure its silicone ring is dehydrated using a hairdryer. Also, make sure your chest skin is dry too.
Using a hair blow dryer to dry the area quickly is best. After doing this, expect the redness and other skin problems to disappear in a few days.
After doing the hairdryer trick, he wore the vacuum bell for 5 hours on average.
The Bottom Line
Taking care of your skin while doing vacuum bell therapy will minimize itching, redness, and other side effects on the skin while using the device.
You can take medications, vitamins, moisturizing creams, and gels to soothe the skin. Don’t worry if skin problems occur. These can be managed efficiently by following the tips I mentioned in this article. Thank you for reading!
Sleeping With the Vacuum Bell
You can use the vacuum bell while sleeping. In my opinion, this is the best time to apply it.
However, many patients are uncomfortable falling asleep with the vacuum bell lifting their sunken sternum. If you’re lucky not to be bothered by the vacuum, feel free to use it while you sleep.
That’s at least 5-6 additional hours of vacuum bell therapy.
Best Sleeping Position For Vacuum Bell

The best position is to sleep on your back. At first, you’ll have an unpleasant feeling while trying to fall asleep with a vacuum bell on.
However, you’ll get used to it after a month, and the strange feeling will disappear.
How to Start Sleeping With Vacuum Bell
Learning how to sleep with your vacuum bell applied is very important. I recommend starting with low negative pressure to get used to the feeling.
When you feel like the vacuum bell doesn’t bother your sleep, gradually increase the pressure. When you sleep with it for at least a month, you’ll get used to sleeping even with high pressure applied.
My Experience
When I started my vacuum bell therapy, I thought that I wouldn’t be able to wear it during sleep. I tried a few times and had a few sleepless nights.
I made a mistake because I pumped too intensely and applied the same pressure as I did during the day.
After decreasing the intensity, the vacuum bell didn’t bother my sleep. I went to the point where I felt weird if I didn’t wear the vacuum bell while sleeping.
Losing Pressure During Sleep
There are a few reasons why you lose pressure while you’re sleeping.
- Quality of vacuum bell
- Sleeping position
- Applying a minimal amount of negative pressure
Quality of Vacuum Bell
Suppose the vacuum bell isn’t sealed correctly. In that case, it will lose negative pressure no matter how well you position yourself while sleeping.
It is very frustrating to wake up in the morning and see that your vacuum bell has fallen from your chest in the night. The quality of the device plays a huge role in this.
You should invest in a vacuum bell from a trusted manufacturer.
Sleeping Position
Stomach Sleeping

I used to be a heavy stomach sleeper. That changed when I read about the importance of the sleeping position for posture and physical health.
However, if you apply the highest negative pressure, the vacuum bell will apply massive force on your chest.
You probably won’t be able to feel your body weight, assuming you’re skinny, as most of us with pectus excavatum are, on top of the vacuum bell.
Having a soft mattress will help with this too.
Back Sleeping

Then, I started being a back sleeper. I put a pillow underneath my neck and below my knees to keep a natural alignment during sleep. Then, when I received the vacuum bell, it was straightforward for me to apply it in this position.
I didn’t lose any pressure because I didn’t move around in my sleep. This is precisely what I recommend you do. You will kill two birds with one stone by becoming a back sleeper.
You will improve your pectus posture during sleep, while the vacuum bell will stay attached to your chest during the night. Avoid sleeping on your stomach or your sides.
Side Sleeping

Side sleeping with a vacuum bell is hard. It is good to put a piece of your duvet cover between the mattress and the vacuum bell for those who like to sleep on your side.
This will help provide support so it won’t fall off easily.
Don’t Be Too Hard On Yourself
I stretch and move around while sleeping when I notice my vacuum bell has fallen off. I usually drowsily reapply it on my chest and fall deep asleep.
Other times, especially if I feel uncomfortable, I quickly decide that it is enough to vacuum the bell for the night, put it away, and fall back asleep. You don’t have to wear the vacuum bell throughout the entire night.
If you don’t wake up, that’s the best scenario. But don’t force yourself with the vacuum bell because getting a good night’s sleep is the most important thing for your well-being.
Tips for Sleeping With Vacuum Bell
If you can’t fall asleep with the vacuum bell, wait until you’re thoroughly exhausted and think you’ll fall asleep as soon as you put your head on the pillow. When you feel this, apply the vacuum bell quickly and fall asleep.
Have the vacuum bell next to your bed if you tend to hit the snooze button before waking up. When the alarm goes off, apply the vacuum bell and go back to snoozing.
At least you won’t feel as bad when you wake up from the snoozing. If you can’t fall back asleep, you’ll be ready for the day.
Make Up For Lost Time
If you have a busy day at school or work, there is no excuse not to use the vacuum bell. Nighttime suction treatment is excellent to make up for the lost time in the day.
That way, you can easily reach a minimum of 8 hours of vacuum bell therapy daily. As a rule, the more you use the suction bell, the faster you’ll notice results.
The Bottom Line
Getting used to sleeping with a vacuum bell can speed up your progress, but it might be uncomfortable at first. Start slowly. Apply minimal pressure and wait until you’re sleepy before putting it on.
As you adjust, you can gradually increase the pressure. Remember, sleeping on your back is best.
In this blog post, we’ve covered tips to make the process easier and more effective. If you have any questions or concerns, feel free to reach out or leave a comment below.
Thanks for reading!
Working Out With the Vacuum Bell Applied
You can do all your daily activities with a vacuum bell applied, with only minor alterations. This is another benefit of this device. Training fits in here as well.
Additionally, as it can be unnoticeable under your thicker workout clothes, such as a hoodie, you can train with a vacuum bell in a public gym.
It would help if you tried to exercise while wearing this device. It is fun to see what it’s like to exercise with your chest flattened and whether it helps you with shortness of breath or other problems the deformity may cause to you.
Do I Like It?
However, my experience has proved that I still like exercising without a vacuum bell applied because I don’t want to focus on it.
I love the sensation on my muscles by training in the gym. The vacuum bell messes up my mind-muscle connection which I value a lot.
I think it is preferable to work out for 30-40 minutes and then wear the vacuum bell for the rest of your day.
Dizziness
If you are new to exercising while wearing a vacuum bell, do not do high-intensity activities.
You may experience dizziness or unpleasant feelings due to the new experience to your body, and some unwanted injuries may occur from the slightest carelessness.
More lightweight exercises and stretches that will not exhaust you are always better at first.
Exercise before or after Vacuum Bell Therapy
As I said, exercising while wearing the vacuum bell is possible, but it is advisable to do it before or after.
The vacuum bell may irritate your skin from extra sweat if you wear it during strenuous workouts or can even fall off because of the sweaty skin while exercising. This can interrupt your workout.
Also, with time the silicone part of the vacuum bell can begin to smell bad and even turn yellowish because of the sweat.
Some people who tried the vacuum bell suggest scheduling the workout before your vacuum bell application.
They say the strength training may temporarily depress your sternum, which you may quickly pull out with the vacuum bell a few hours later.
Lifting weights after vacuum bell
People are often in a dilemma about whether to exercise after wearing the vacuum bell. My answer to this question is that it can, but before that, you must know that we should know ourselves best.
Some patients share the experience that after wearing the vacuum bell, they have slight dizziness, which means that it will still take some time off before they exercise until their condition calms down.
If you feel well, of course, it is safe to exercise before doing a well-warming-up routine.
So, regarding this issue, it is best to know that there is no need to be afraid. The vacuum bell is a device that can surely help with your deformation painlessly, but when it comes to working out, know that everyone’s experience is unique.
Please, pay attention to your personal feeling. If it works for you to wear your device while working out, do it and enjoy your transformation. Thank you for reading!
Vacuum Bell Therapy and Bodybuilding
Weightlifting can support vacuum bell therapy by strengthening the weak back muscles responsible for proper posture.
It is essential to focus on proper technique to reap the maximal postural benefit of the exercises while limiting the risk of injury. Mr. Eckart Klobe himself recommends exercising to support the vacuum bell therapy.
In this article, I will write about everything you need to know about vacuum bells and bodybuilding.
Vacuum Bell Therapy Impacts Muscles
According to Eckart Klobe, lifting the chest wall stretches the muscles that are pulling from the inside, such as the diaphragm and the transversus thoracis muscle.
Because of this, these muscles will get used to their new position and won’t pull the sunken chest inward quite as far as when you remove the vacuum bell device.
Generally, this muscle adaptation takes the most time in the whole treatment procedure.
Mr. Klobe’s Accessory Bodybuilding Exercises
Accessory physical exercises are critical to straighten, stretch and tighten the upper body to support the vacuum Bell therapy.
According to Mr. Klobe, you cannot expect that only the vacuum bell application alone will improve posture. Typically, the vacuum bell can overcome the skeletal resistance of the sunken chest.
Strengthening the Back Is Key
Still, proper posture is only possible thanks to the strength of the patient’s muscles. That is why strengthening the back muscles with weightlifting will positively impact the success of vacuum bell therapy.
Two Bodybuilding Exercises
Eckart Klobe recommends the following two bodybuilding exercises to support a vacuum bell treatment:
Dumbbell Swings
This is a simple exercise you can perform. All you need is a set of light dumbbells. To start, grab one in each hand. Mr. Klobe recommends a 3-5% of your body weight dumbbell. When you get used to exercising, you can increase your weight.
Swing the dumbbells in a motion like a tennis payer swinging his racquet or a boxer swinging his fists as if he is throwing something.
Mr. Klobe recommends performing this exercise every day for about five minutes. As he says, this exercise aims to strengthen the upper back musculature.
Dumbbell Pullovers

Start by grabbing a light dumbbell (3-5% of your body weight in each hand) and lay on a bench on your back. Press the dumbbells and the resulting hollow back flat on the bench using your motor activity.
You should do the exercise for one minute every single day. According to Mr. Klobe, the pullover raises the sternum through the pectoral musculature and flattens the flaring ribs through the abs.
I recommend you add these exercises to your bodybuilding routine. That way, you will reap the benefits of both exercises meant to increase the mass of your muscles and corrective exercises to accompany vacuum bell therapy.
“Bodybuilder” Vacuum Bell for Bodybuilders
A particular vacuum bell size is built with thicker silicone made for bodybuilders and unique applications.
This model has slightly slimmer and softer sides than the classic model. Thus, the bodybuilder vacuum bell (19 cm) will be gentler on large chest muscles and sensitive nipples.
When there is horizontal indentation along the diaphragm line, it may initially bend the rib cage along this line and thus open an anatomically good way to lift the breastbone further.
My Bodybuilding and Vacuum Bell Therapy Experience

While doing the vacuum bell therapy, I also did a lot of weightlifting and yoga 3-to five times a week. The vacuum bell didn’t affect my training. Surprisingly, it was an extremely positive experience!
I focused mainly on the musculature of my chest, core, and back. You should never neglect back training. Those muscles are responsible for keeping your posture upright and sturdy.
The combination of physical therapy and suction bell treatment made the dent in my chest unnoticeable.
Performing bench presses, dips, chest flies, dumbbell pullovers, pull-ups, and rows will significantly impact your deformity. Weightlifting will strengthen you mentally and physically and help you build discipline for applying vacuum bell.
Combining weightlifting and vacuum bell therapy made the dip in my chest much less noticeable.
My chest muscles became toned and muscular, increasing my confidence in showing my chest to others.
Bodybuilding Taught Me Discipline
I didn’t struggle with the discipline of applying the vacuum bell daily. I genuinely believe that weightlifting was a direct factor in this.
I always thought performing these heavy exercises was ten times harder than having the discipline to put on the suction cup for a few hours a day.
Applying the vacuum device will be a breeze if you go to the gym for a few days a week. Additionally, I highly recommend you do yoga, Pilates, or other posture-improving exercises before starting the vacuum bell treatment.
That will stretch your anterior chest wall. Placing the suction cup directly over the dent will be much easier. Also, you will significantly minimize the chance of the vacuum bell falling off your chest.
Walking upright with a stable posture will ensure that the suction cup stays on your body tightly.
The Bottom Line
Performing bodybuilding exercises can help you strengthen your back muscles and improve posture. This will help with the success of the vacuum bell therapy.
According to Mr. Eckart Klobe, performing light dumbbell swings and pullovers can help with the treatment. Bodybuilding builds discipline.
That alone will help you with the consistency of the vacuum bell application. Adding muscle strength and mass will only be a side benefit of bodybuilding.
Thank you for reading!
Conclusion
In this article, I wrote about the phases of vacuum bell treatment and what to expect during the first few months of therapy. You’ll be motivated by the fantastic progress in the first months.
Then, the progress will slow down, but the deformity will still improve. It would be best if you were consistent in applying the device.
If needed, you can take a few days’ breaks if you experience skin problems.
Thank you for reading!
Sources
- Haecker FM, Sesia S. Vacuum bell therapy. Ann Cardiothorac Surg. 2016 Sep;5(5):440-9.
- Instructions for use 2010 11 03 M7.pdf [Internet]. [cited 2022 Nov 24]. [Read it](https://www.grudina.ru/upload/Instructions for use 2010 11 03 M7.pdf)
- Pectus Excavatum: Vacuum Bell Device (for Parents) - Nemours KidsHealth [Internet]. [cited 2022 Nov 24]. Read it
- Incorporating vacuum bell therapy into pectus excavatum treatment - PMC [Internet]. [cited 2022 Dec 1]. Read it
- 7 Health Claims About Astaxanthin [Internet]. [cited 2022 Dec 1]. Read it
- Ito N, Seki S, Ueda F. The Protective Role of Astaxanthin for UV-Induced Skin Deterioration in Healthy People - A Randomized, Double-Blind, Placebo-Controlled Trial. Nutrients. 2018 Jun 25;10(7):817.
- Enhancing Skin Health: By Oral Administration of Natural Compounds and Minerals with Implications to the Dermal Microbiome - PMC [Internet]. [cited 2022 Dec 1]. Read it
- The 4 Best Vitamins for Your Skin [Internet]. [cited 2022 Dec 1]. Read it
- PE_BOOK2.pdf [Internet]. [cited 2023 Jan 26]. Read it
- OT V. Trichterbrustversorgung mit der Saugglocke nach Eckart Klobe [Internet]. Orthopädie Technik. 2019 [cited 2022 Dec 1] https://360-ot.de/trichterbrustversorgung-mit-der-saugglocke-nach-eckart-klobe/
- Transversus thoracis muscle [Internet]. Kenhub. [cited 2022 Dec 1]. Read it
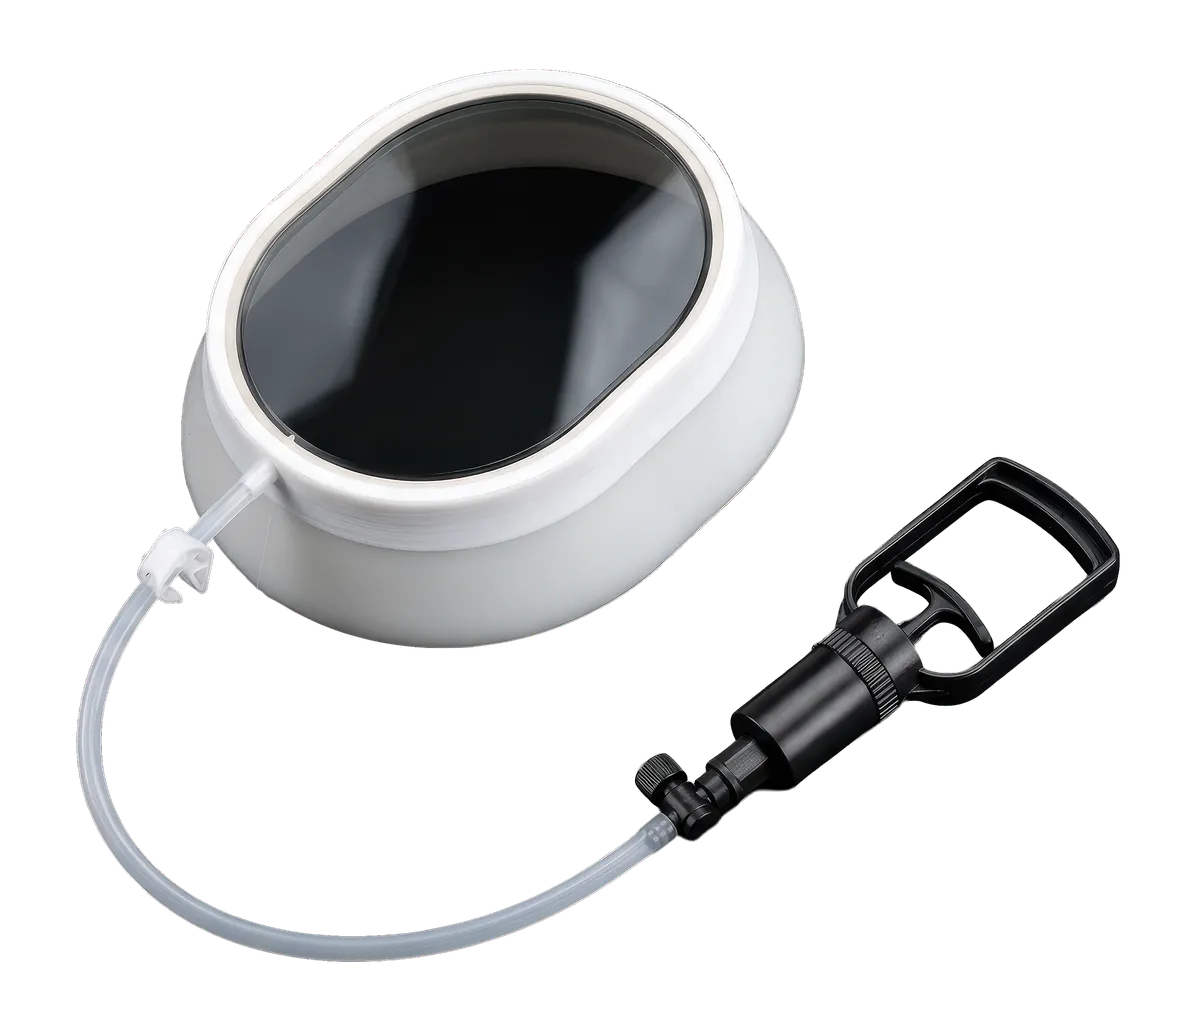
A bell sized to your chest and depth, with the session length and suction progression that decide whether it works.
- Cup sized to your chest, not a size chart
- Session length and pressure progression
- How to tell at 8 weeks if you are responding

This article is for educational purposes only and does not constitute medical advice. Always consult a qualified healthcare professional before starting any treatment plan. View full disclaimer →